Lightboxes
December 13, 2021
Making custom light boxes and working with neopixels.
Its the holiday season and we’ve been trying to figure out what
to give some of friends as gifts. Also we recently picked up a
Cricut and have been looking for different crafty projects we
can take on to make use of the new tool. Why not tackle two
birds with one stone and use the Cricut to make their gifts.
While working through what we could possible make with the vinyl
cutter, I remembered of a souvenir I picked up from a model
store that was “Paper Theater”.
Fast forward to some searching for templates online and a quick
trip to the local craft store for some thicker paper and we’re
off to the races.
Making the lightbox itself
For the most part, picked up a template from a random site
and then fiddled around settings and different paper thicknesses to successfully
cut out the templates on our Cricut.
Ultimately we settled on using a “light” cut mat with the standard fine point
blade to do the cutting. For the materials, we used 65lbs white paper and the deepest
8in x 10in shadow box we could find as the frame.
When assembling the layers we used 2mm foam board to stack the layers and add
some depth to the lightbox.
LED strip, the hard way
One of the key features of a light box is of course to light it from behind the
cutouts that you make to give it all a nicer depth. This is usually achieved
with an off the shelf led strip that has an IR controller and is battery
powered. While that would work well enough and would quickly and neatly wrap up
this project for me, I thought that it would be cool if I was able to make
custom light patterns for the different light boxes that better match the
display itself. This would mean rolling my own code and using individually
addressable RGB LEDs to illuminate the back of the paper stack.
High Level Circuit
For individually addressable LED light strip I opted for the reliable and easy
to find WS2812B and picked up a light strip from Amazon. To drive the LED strip
I really only needed a single pin so using a whole Arduino to just toggle an
individual pin seemed like a waste. Also knowing that I would probably want to
have this powered off of a battery pack, I wanted to minimize the
power draw of any microcontroller that I end up using. Poking around different
small form-factor microcontrollers, the ATTiny85 seemed to check all of the boxes
to control the light strip.
ATTINY + Neopixels
The ATTiny85 microcontroller comes in a basic 8pin DIP package. Unlike your
typical Arduino, these micro’s don’t come with a USB port or serial converter
to upload programs. Instead, an AVR programmer or an Arduino as an ISP is used
to upload programs by wiring specific pins to power on and configure the
controller.
To program the ATTiny85, I used the Arduino IDE and installed the Attiny family
of boards using the board manager.
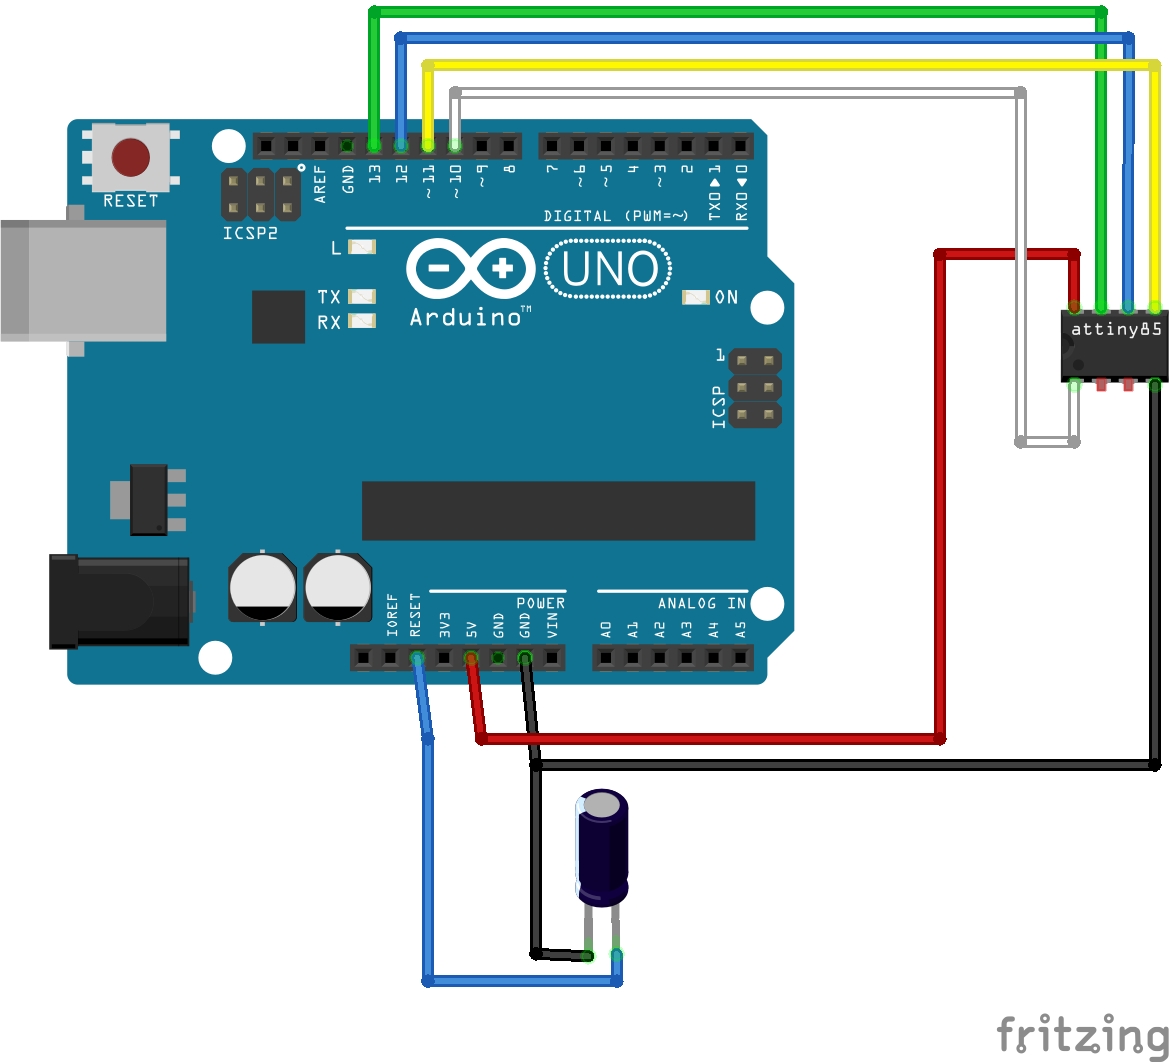
| Arduino |
ATTiny85 |
| Pin 13 |
Pin 2 |
| Pin 12 |
Pin 1 |
| Pin 11 |
Pin 0 |
| Pin 10 |
Reset |
| 5V |
VCC |
| GND |
GND |